Friday, 18 February 2011
Ahhhhhhhhh-wouldjalookitthem.
I got a commission to do a portrait for a Valentine's Day gift, which I can post now it's been safely delivered and given. The photograph I worked from was a front-on flash photograph, and so the facial features were very evenly lit, which was tricky. I found that using the usual 2B pencil made shadows look unfortunately like a beard, so I changed to 2 and 4H which gave a much lighter mark.
The phrase "aaaaaaahhh, wouldjalookit them" has become something of a household catch phrase and arose from a pissed Irish bloke in The Muppet Inn (that's what I said, yes) in Wisbech. It was hard not to go into a pub called the Muppet Inn, but less hard to leave it. I bought Laura a pint of cider, which apparently Irish Bloke took as a symbol of my long-term fidelity and moved him greatly.
Monday, 14 February 2011
Friday, 11 February 2011
Red Square
I bought a bagload of cheap square canvases (and, boy, do I mean cheap) in order to try out a new sort of style that had been tickling away at the back of my mind for a while. I think I've had a step forward. Trying to get a sense of light, wind, rain, space, air and place.
Labels:
landscape,
northumberland,
oil painting,
scottish borders,
squarescapes
Thursday, 10 February 2011
Little Brownish Jug.
Water Jug, oil on canvas, 9" x 12".I did the background quickly and very loosely, and concentrated on the light passing through the glass and the water, which is a phenomenon I never get tired of. It's lovely. This was based on a photograph taken on a camera phone when we were invited round to some friends' to eat. They had spotlights in the ceiling and placed the jug right underneath one so that it was full of light.
Monday, 7 February 2011
Succulent
Pencil study of succulents and cacti, Giardino dei Semplice, Florence, 15cm x 15cm.I started this study before I launched into the comic strip competition entry. I had something of a breakthrough in my painting technique recently, too, of which hopefully more later, very impressionistic, almost semi-abstract - which is very exciting, but I was really happy to get back to the glasses-off microscopic pencil-stroke stuff. It's got me a portrait commission, too, which I've done and sent a scan to the client for approval.
I've already spent the money. I bought a second-hand Campagnolo chainset on eBay from a bloke in France. Absurdly pleased to have "Campag" on my bike. (I can say "Campag" now, although I'll try really hard not to be such a twat.) And of that, too, more later.
Wednesday, 2 February 2011
Brian #5: Questionable Content
Tuesday, 1 February 2011
Borderline Behaviour
10 steps to create a text with black borderline and overlay it on an image, using GIMP 2.6.
I learned how to do this over the weekend, so I'm going to share while it's still fresh in my mind.
I wanted to overlay a word on a panel, and wanted white text with a black border. Importantly, the background image had to be seen behind the letters of the overlaid text.

Step 1.
Open the image onto which you want to put the text.

Step 2.
Create a new, blank image. (Tip:I haven't, but if you make this a grey background, it will help when you turn the text to white in Step 4.)

Step 3.
Using the 'Text' tool, create a text box, choose the font style (this is DigitalStrip Bold) and enter the word. For arbitrary and puerile reasons I'm going to put 'Arsebiscuits!' onto this image.

Step 4.
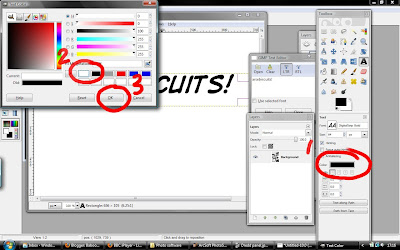
Change the colour of the font to white using the text colour function. If you've made the background to grey then the text won't 'disappear.'

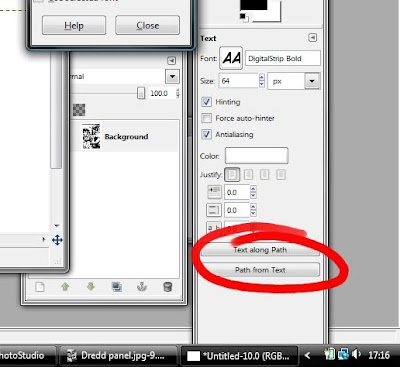
Step 5.
Click on 'Path From Text,'

then select the 'Edit' drop-down menu. From here scroll down and select 'Stroke Path.'

Step 6.
This will open an options box. In this case I'm using plain, solid colour, and reducing the line thickness to 3.0 pixels. Once this is done, click 'Stroke.'
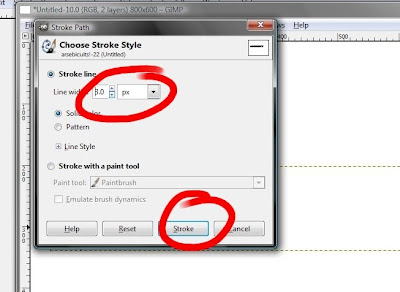
This can take a while, so don't panic if it appears that nothing is happening. Your text will eventually appear with the border around it.
Step 7.
Using the 'Rectangle Select' tool, outline the newly-bordered text. Right click 'Copy.'
(It's important not to merge this text layer down before selecting and copying; the above steps mean you'll create and copy the text with a transparent background.)

Step 8.
Return to the original image. Right click 'Paste.' The text, with transparent background appears on the picture.

Step 9.
At the moment it's too small and in the wrong place. There are good tools on GIMP to shift things around; Scale, Shear, Rotate and Move (highlighted in green) mean you can resize, reshape and move text like this around until you're happy.
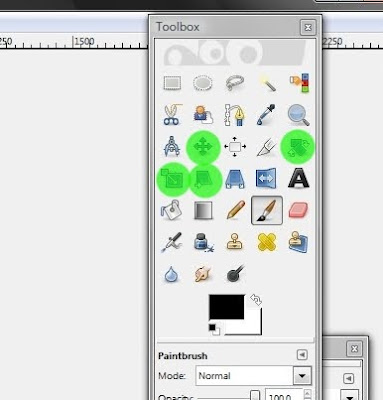
In this case, I'm scaling the text layer; use the box 'handles' to drag it and re-shape it; once you're happy click on the 'Scale.'

Step 10.
Once the text is the right shape and in the right place, it needs to be 'fixed' to the drawing beneath. In the 'Layers' drop-down menu, click 'Anchor Layer' and that's it, done.

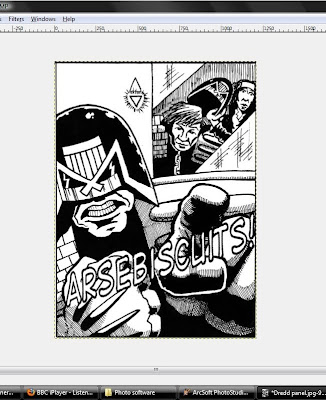
(And I was listening to the transfer day madness unfolding, in case you were wondering.)
I learned how to do this over the weekend, so I'm going to share while it's still fresh in my mind.
I wanted to overlay a word on a panel, and wanted white text with a black border. Importantly, the background image had to be seen behind the letters of the overlaid text.

Step 1.
Open the image onto which you want to put the text.

Step 2.
Create a new, blank image. (Tip:I haven't, but if you make this a grey background, it will help when you turn the text to white in Step 4.)

Step 3.
Using the 'Text' tool, create a text box, choose the font style (this is DigitalStrip Bold) and enter the word. For arbitrary and puerile reasons I'm going to put 'Arsebiscuits!' onto this image.

Step 4.
Change the colour of the font to white using the text colour function. If you've made the background to grey then the text won't 'disappear.'


Step 5.
Click on 'Path From Text,'

then select the 'Edit' drop-down menu. From here scroll down and select 'Stroke Path.'

Step 6.
This will open an options box. In this case I'm using plain, solid colour, and reducing the line thickness to 3.0 pixels. Once this is done, click 'Stroke.'

This can take a while, so don't panic if it appears that nothing is happening. Your text will eventually appear with the border around it.
Step 7.
Using the 'Rectangle Select' tool, outline the newly-bordered text. Right click 'Copy.'
(It's important not to merge this text layer down before selecting and copying; the above steps mean you'll create and copy the text with a transparent background.)

Step 8.
Return to the original image. Right click 'Paste.' The text, with transparent background appears on the picture.

Step 9.
At the moment it's too small and in the wrong place. There are good tools on GIMP to shift things around; Scale, Shear, Rotate and Move (highlighted in green) mean you can resize, reshape and move text like this around until you're happy.

In this case, I'm scaling the text layer; use the box 'handles' to drag it and re-shape it; once you're happy click on the 'Scale.'

Step 10.
Once the text is the right shape and in the right place, it needs to be 'fixed' to the drawing beneath. In the 'Layers' drop-down menu, click 'Anchor Layer' and that's it, done.


(And I was listening to the transfer day madness unfolding, in case you were wondering.)
Subscribe to:
Posts (Atom)